


Color Field Inspired Glass Fused Pendants
- Feb 16, 2017
- 4 min read

This project has definitely become one of my favorite projects. Not only do the kids love it and the results are fantastic but it has become one of my best fundraisers for the art room raising over $1,000 a year.
I first became aware of glass fusing at a Wisconsin Art Education Fall Conference. The amazing Denny Berkery always does great sessions and has a hands on booth at conference. Last year I was finally willing to take the plunge into the unknown of glass arts. I started with purchasing The Vinary's Fused Pendant Fundraiser Kit ( vineryglass.com). This may have been the best and worse decision of my art teacherin career. The best because not only are the students loving the glass arts but their parents are too! The worse because it has opened a whole new can of worms. What do I mean by this? You never really know how many facets something holds until you really dive into. It is amazing all the things that you can do with glass and so began my obsession with the glass arts. On the first day of this project I talk to students about non-representational art and found this great video on Color Field Artists. I have students research some Color Field Artists, I throw up a list of artists names on my smart board and let students use the iPads to research different artists. Student create one glass fused pendent design inspired by a color field artists' painting and their second design is their choice. I also explain to students that they will be keeping one of their pendants as their own and they can either buy the second pendant back for $20 or donate it back to the art room so we can do this project again next year.

Materials: Vinery Glass Fused Pendant Fundraiser Kit
432 pieces of 216 clear and 216 color 1" by 1.5"
6-2 oz tubes of frit (glass shards)
216 silver bails
216 cords
4oz stringer pieces (glass rods)
4oz dichroic glass
1 tube E60000 adhesive
basic fusing instructions and firing schedules
Other Materials
Tweezers
super glue one per student
small trays
Magnets
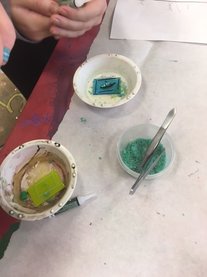
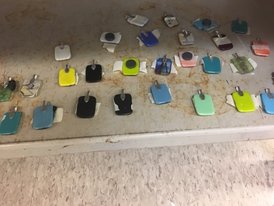
On the second day students create their pendents. This process goes pretty slick. I first put large white paper on the tables to help catch any extra glass. On top of the paper I have small containers each containing different colors of frit (glass shards) and stringer (glass rods) pieces. Students start at one table they grab a small little bowl to place their base color piece in and a super glue. All of the frit containers have tweezers students can use to grab the small pieces of glass to transfer to base piece. Students then carefully walk around the classroom, place small amounts of super glue to their base piece, and add frit and stringer pieces. We have also discovered that the stringers are pretty easy to break into the sizes that you need if you just press it against the side of your base and break it. When students finish making one pendent they bring it over to the finishing table and place a clear top piece ontop of their pendant. They then take a small piece of kiln paper to place under their pendant onto the kiln shelf that is laying on the finishing table. I then have a piece of paper that is the same shape as the kiln shelf. Students draw a square on the piece of paper and add their name. Once they have finished making one pendant the do the entire process again. They are able to complete both pendants in a 45 minute class period.


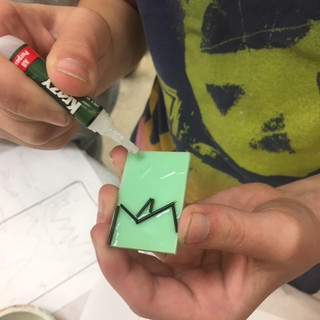
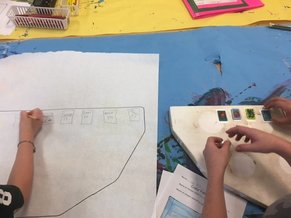


On the third day students get back their fused pendents after being fired and photograph them for artsonia. After they photograph I have them put their names on them with a piece of masking tape. Their last task is to write an artist statement for the pendant that they are donating back to the art room. Their artist statements have three parts -the first part is for them to share how they created their pendant and why they chose the shapes and colors that they used. The second paragraph talks about them as an artist what they like to do in the art room and if they have a favorite artist or style. The third paragraph is for them to share a little bit about themselves as a person their hobbies and interests. While they are working I will call them over and have them tell me which piece they are keeping and if they want that to be a necklace or magnet. I use the E6000 glue to attache the magnets and bails. The artist statement sometimes take more then a day. When they come back and finish their aritsts statements I have them put the silk cord onto their necklaces and attache artist statement.

This has been such a fun successful project and I can't wait to try it out again next year. How do you incorporate glass or jewelry making into your curriculum?


Comments